 I have never enjoyed the transition from early fall into late fall and then winter. Watching the world turn leafless and brown just gets me down! As with many things though, taking a deeper glance into the details of the season reveals the quiet beauty that the cold unveils.
I love making several bouquets each week during the summer and early fall to bring a bit of garden beauty into the home, why not do the same with what the cold season has to offer? With that in mind, I decided to force myself to see the beauty of the season, and not get depressed by the onslaught of cold and darkness, by creating arrangements and decor from my fall garden. Lo and behold, what did I find? Quite a bit of beauty, most of it tucked into seed pods! In addition, the walk through the garden and woods on a hunt for beautiful specimens was quite a treat.
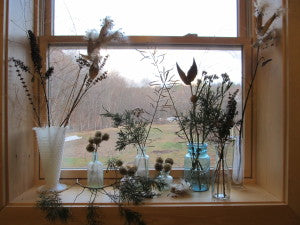
The gist: Dried flower arrangements are all about structure, since there isn't much color to speak of. The easiest arrangements for me are ones where I place a few very interesting specimens in small vases and group them together. I also used a bit of gold spray paint to add a more festive touch. That idea came from Susanne Kongoy of GRDN, a lovely Brooklyn nursery and flower shop (where you can find our seeds!). Susanne offers dried flower bouquets in the fall, and when asked how to care for them she answered, "Don't put them in water, and when they get dusty, spray paint them gold or silver."
One potential downside, depending on how tidy you are: Some of the more interesting dried flowers still had seeds in them, which have a tendancy to drop, in part by being handled, but also by gravity. This means you might end up with plant debris surrounding your arrangements.
Several small vases, jars, and/or bottles
Clippers
Gold or silver spray paint (optional)
Dried flower and seed head specimens--straight from the garden on November 23rd! My favorites include, but aren't limited to:
- Kale or broccoli seed heads
- Starflower*
- Strawflower
- Milkweed seed heads

- Garlic Chive seed heads
- Statice
- Love in a Mist
- Asparagus fronds
- Queen Anne's Lace
- Anise Hyssop
Evergreen branches
Twigs or thin branches
To spray paint: Select a few interesting specimens, or go all out and spray paint your entire bouquet! In a well ventilated area, spread out several sheets of newspaper. Line your dried flowers close to each other, but not touching. Spray a light, even layer until the paint evenly covers that side, but take care to leave some stem dry so you can easily flip the flowers over. Flip the flowers over and repeat. When you feel the flowers have a good, even coat, move them out of any pooling paint and let dry completely, about 1-2 hours.
To create: I found that keeping things simple was best, focusing on one highlighted piece per vase. Play with heights, and follow the rule of traditional bouquet making: Always place flowers in odd numbers. Have fun!
***
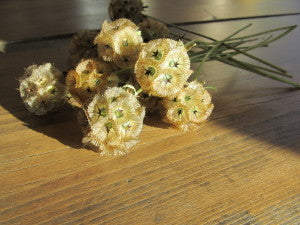
 *So, if you've never grown Starflower, Scabiosa stellata, plan on doing so next year! The demure white flowers transform into the most delightful, papery pom-poms. I don't know what this project would be without them! (Tip: we had our best seed crop yet this year after Farmer Stu spoiled the crop a bit while it was getting established, with applications of worm castings and plenty of compost.) Starflower can be featured in fresh flower bouquets, as well as dried.


